“With great power comes great responsibility” – you’ve probably heard this Spiderman quote a thousand times. Well, here’s a modified one for you – “With a great car comes great responsibility”; and one of the first & foremost responsibilities for car owners is knowing how to change or remove a tire/wheel. Although a car’s tire is specifically the rubber part that goes on the metal wheel, we’ll use the terms wheel/tire interchangeably in this article for simplicity. Incidentally, running a great tire on your vehicle will lessen your chance of incurring an unexpected flat in the first place.
Imagine you’re on a long drive & get stuck in the middle of nowhere with a flat tire – you can’t access a mechanic & may have to wait hours before someone can pick you up or get you a lift.
Does that situation sound like fun? Of course not. That’s why learning how to change your own wheel is essential. So, here’s a simple guide to teach you how to do just that.
Getting a Flat Tire While Driving
The following section is for those who are unfortunate enough to suffer a flat tire while out driving:
- Find a safe place to pull over or park your car, preferably far away from the main roads. While doing this, don’t panic & try to brake or turn quickly because that may worsen things. Brake slowly & reduce your speed gradually while getting to the side of a road or a safe place.
- Turn the hazard lights on as soon as possible.
- Apply the parking brake when you have pulled over, which prevents your vehicle from rolling.
- Use wheel wedges. If you’re changing a front tire, put the wedges behind the rear wheels. If you’re changing a rear tire, put the wedges in front of the front tires.
Items Needed to Change a Wheel
- Spare tire (fully inflated, of course)
- Jack
- Lug wrench
- Flashlight
- Small plank of wood for securing the jack
- Wheel wedges
- Gloves
- Mat for comfortable kneeling
- Rain poncho
- Tire gauge
- Vehicle owner’s manual
The 7 Steps of Changing a Wheel
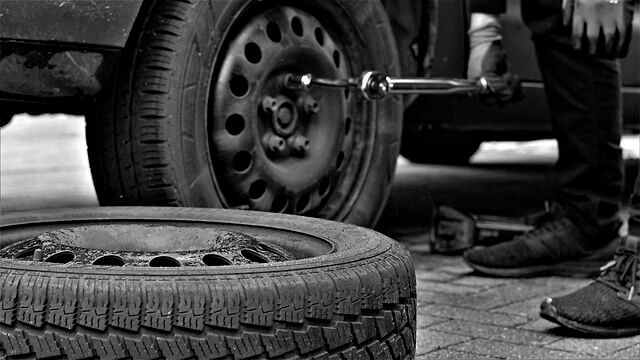
1. Loosen the Lug Nuts
If your vehicle has a wheel cover or hubcap, take it off. You can take it off with the flat part of your lug wrench. Alternatively, you can use a flathead screwdriver or a special hubcap removal tool. Pry the hubcap off, being careful not to crack it.
After that, turn the lug nuts counterclockwise with the lug wrench to loosen them. You may have to use some force to get a stuck lug nut turning. Don’t take the nuts all the way off at this stage; just get them loose.
2. Lift the Vehicle Above the Ground
Now it’s time to jack up your car. Place your jack under a jack point near the wheel that needs to come off. Your vehicle’s owner manual will help you to find these special spots that are safe to use when jacking up your car.
It’s imperative that you don’t jack up your car using your car’s body molding or other unstable parts. Jack up your car until the wheel is no longer touching the ground.
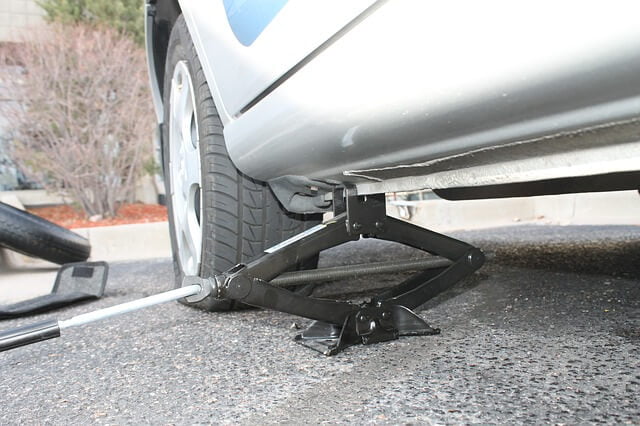
When you’re on the road or an uneven surface, it’s preferable to place a small plank of wood under the jack before you raise your vehicle. This will prevent the jack from slipping or failing.
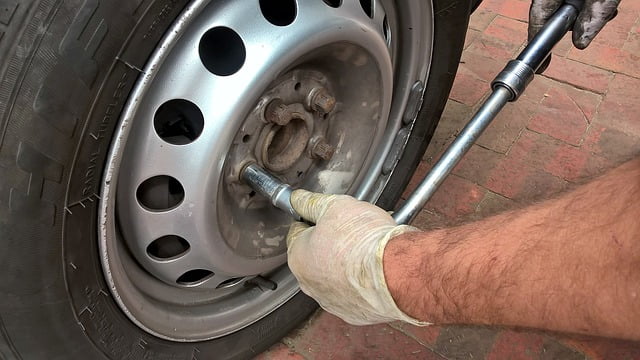
3. Remove the Lug Nuts & Tire
Turn the lug nuts counterclockwise until they are all very loose. Next, remove them completely. Keep the lug nuts together in a safe spot, as you’ll need them to mount the spare tire.
Securely grip your wheel and pull it directly toward your body to remove it without friction. The wheel will be heavy, so be careful.
4. Mount the Spare Tire
Line the holes of the spare wheel with the lug bolts & mount it. Make sure that the air valve of the spare tire is facing outwards. Take care not to rock the vehicle while the jack is in use.
5. Tighten the Lug Nuts by Hand
Put the nuts back on the lug bolts & tighten them as much as you can by hand. Don’t use the wrench again while the car is on the jack, as it could knock it off.
6. Lower the Vehicle & Tighten the Nuts
Lower the vehicle so that the spare tire rests on the ground. Don’t fully lower the jack yet, though. Continue to use the jack to support some of the car’s weight.
Then, tighten the lug nuts with the wrench, turning them clockwise as much as possible. Push down on the lug wrench with as much weight as possible.
7. Completely Lower the Vehicle
Now bring the vehicle all the way to the ground and remove the jack. Try to give the lug nuts another pull with the wrench to ensure they are as tight as possible.
You’re now ready to begin driving with the spare tire. It’s important to drive slower and more carefully with this smaller wheel.
Cleaning Up
After wrapping up the job, pick up all your equipment and the bad tire. Stop by a gas station to inflate your spare tire if needed.
Your old tire may be able to be patched, or you may need a new tire altogether. Take it to a mechanic to see what can be done.
Final Words
Knowing how to remove a wheel is a very valuable skill. You never know when it might come in handy, and you may even be able to help out a friend.
So, ensure that you have a spare tire and tools handy in your vehicle, especially if you plan to travel. It’s always wise to be prepared. Safe travels from Moto Answers!